Database Installation Wizard
If you want to change the settings later, you can do so in the database settings in the DOC under Settings  -> Backend -> Server settings or Database & event data maintenance. Further information can be found in the technical articles "Database Guide" and "Database Migration" on DriveLock Online Help.
Follow these steps to install the database:
-
Click Next in the Welcome to DriveLock Database Installation Wizard dialog.
-
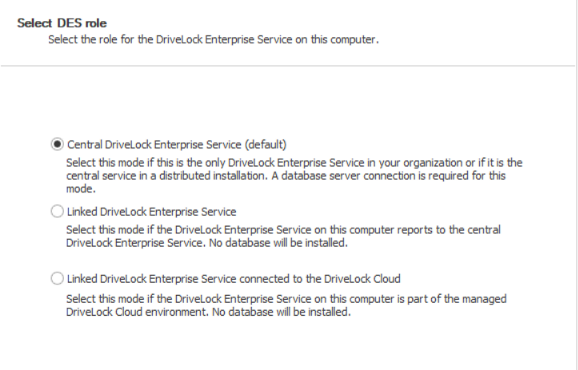
In the following dialog, select the Central DriveLock Enterprise Service option if you want to create a new database.
It is the default option if you chose the DES option when installing the server.
-
The Linked DriveLock Enterprise Service option is suitable for creating linked DES, for which you do not need to perform database installation again.
-
The Linked DriveLock Enterprise Service connected to the cloud option is used if you have the DriveLock Managed Service solution and are dealing with agents that do not have a direct Internet connection. In this case, the connection to DriveLock Cloud can be established using the linked DES as an intermediary.
-
-
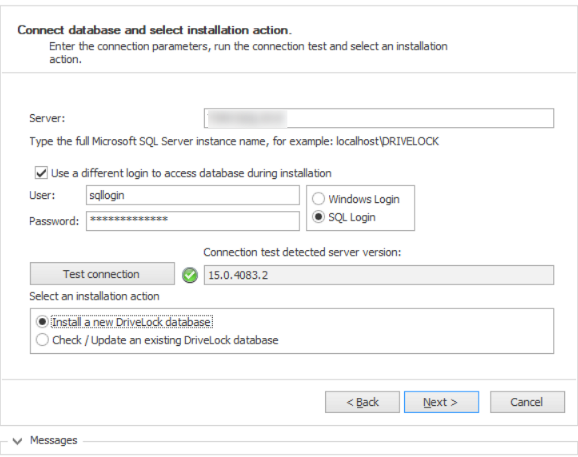
Next, specify the connection details for the database server.
-
Here you can optionally specify a different user for database access. Windows and SQL Server authentication are possible. This data is not stored and is used exclusively for the installation/update.
If you want to specify the port, the database installation wizard supports the following notation:
FQDN,Port\Instance (e.g.: myDLServer,14330\SQLEXPRESS) -
After entering the server name, click the Test connection button. The connection is established when the green check mark appears. If connection issues occur, they will be displayed in the area under Messages. You can then find an appropriate solution.
-
Select Install a new DriveLock database as installation action.
-
-
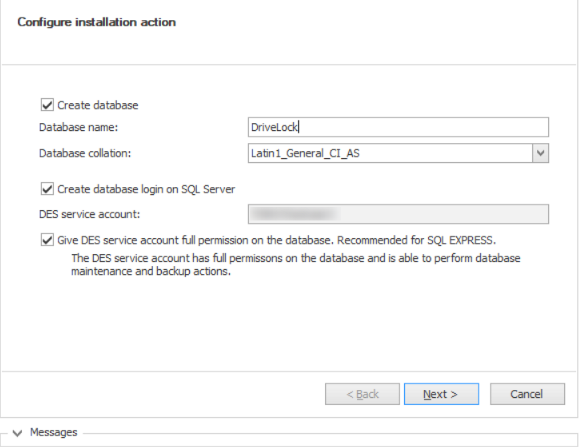
There are several solutions for creating the database, based on different scenarios.
-
Create database:
This option is set by default. The database is created on the SQL server. The account performing the installation must have appropriate permissions on the SQL Server (dbcreator role). If you deselect this option, you must provide a database. The schema is then installed into this database.
-
Create database login on SQL Server:
This option is also set by default. A login is created for the service account of the DES. The account performing the installation must have appropriate permissions on the SQL Server (securityadmin role).
-
Give DES service account full permission on the database (db_owner). Recommended for SQL Express:
This option is not set by default. It gives the DES service account maximum rights to the DriveLock databases, allowing it to perform tasks such as maintenance (index maintenance), cleaning up old records and backing up the database.
For larger environments or when running on a full SQL Server, we recommend disabling this option.
-
-
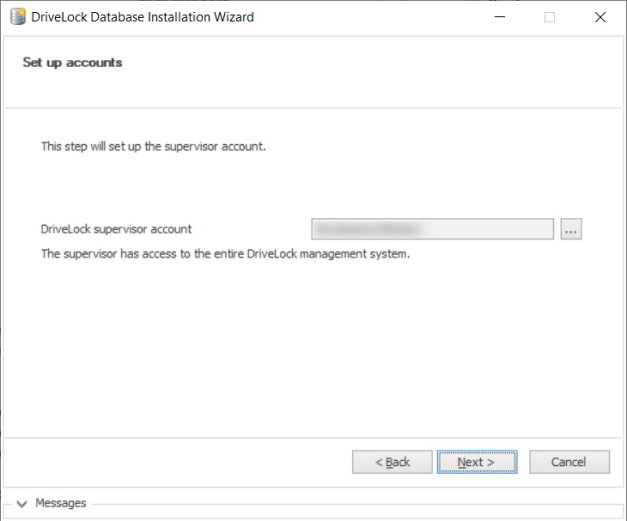
Next, specify the administrative user accounts for the DriveLock management components. This is usually the DriveLock administrator who will be used to run the installation.
-
In the next dialog, specify whether you want to enable database maintenance or backup. Accept the default options.
-
The last thing you will see is a summary. Click Finish.