Configuration of the DriveLock Management Console
If you have not yet installed the DriveLock Management Console (DMC) via the DLSetup.exe, you can install it separately via the DriveLock MMC X64.msi.
Once you have completed the installation, the DriveLock Management Console entry will appear in your Start menu under DriveLock.
First, a wizard starts to help you set up the connection settings for the DriveLock Enterprise Service (DES).
Please do the following:
-
After confirming the welcome dialog, select the Use DriveLock Enterprise Service option in the next dialog.
-
Enter the server name and the port. Use a fully qualified name. Use 6067 as the port. Click here for more information on the ports.
-
Select the default root tenant from the drop-down list under Tenant.
-
If you want to specify a different user for your server, enter the relevant information. This can be useful, for example, if you want to restrict access permissions.
-
-
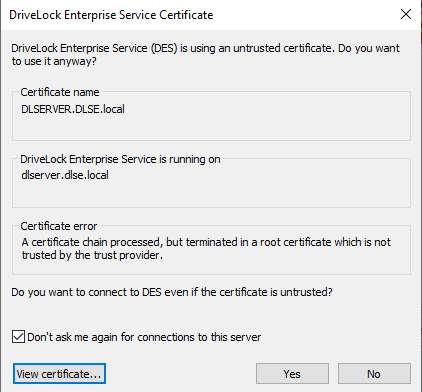
If the DES uses a self-signed certificate, you must then confirm the certificate as trustworthy.
-
Click the Certificate... button to check that this is actually the certificate that the DES is using.
-
Check the option Do not ask for connections to this server again.
-
Confirm the dialog with Yes to use the certificate.
-
-
In the final dialog, specify how often the system will check whether new versions of the DriveLock Management Console are available. The version status is queried directly via the DriveLock Cloud.
-
Click on Finish to confirm your details.